Overview
Recently I started playing around with OpenStack Trove which is a database as a service (DBaaS) within the OpenStack cloud computing platform. Currently, at least according to documentation only mysql and mariadb are fully supported, where postgresql is partially supported. There are experimental drivers for other databases types and there are most definitely some cloud providers out there offering these through trove by doing some recon ;). By no means should this post be an end all, be all, definitive guide. This is still very high level and not overly in depth. I will make a Part 2 in the future.
Additionally there are a ton, and I mean a ton of configuration options that are not covered. I should note too, that some of the database versions I am running such as mariadb 11.3.2, mysql 8.3 are strictly for testing, there is no mention of their full support in Trove docs at the moment, at least from what I can tell, within the Trove project.
Initial Thoughts
While there is a steady stream of contributions to the Trove project, I would not consider it to be nearly as up to date as with others within OpenStack. Support for newer database versions is definitely lagging behind and feel that enabling this project will require more administrative overhead than many other components that make up OpenStack. I realize that of course with enough man power this likely would become far less of an issue, especially if someone was more skilled with different databases than myself. Though with a smaller team and running this in production, it may be difficult to allocate resources to using the Trove project as is and/or forking it as well as self maintaining custom images/datastores etc. (Strictly speculative).
Database Configuration Types:
Single Database instance:
- A single instance hosting the database. This setup is straightforward and may be suitable for development, testing, or small-scale production environments where the database load is light, and high availability is not a critical concern.
- The main advantage is simplicity and lower resource usage compared to more complex setups. However, it lacks redundancy, scalability, and failover capabilities, making it vulnerable to single points of failure. If the server goes down, the database becomes inaccessible.
Replicas:
- A replica architecture involves creating one or more copies of a database, which are synchronized with the primary database. This setup is used to enhance data availability, improve read performance, and provide failover capabilities.
- Read replicas can offload querying tasks from the primary database, thus improving its performance for write operations. In the event of primary database failure, one of the replicas can be promoted to serve as the new primary database, minimizing downtime.
- While replicas enhance availability and read performance, they introduce additional complexity in synchronization and management. Write operations still rely on the primary database, which can be a bottleneck.
Clustered Databases (Currently not supported in Production):
- A clustered architecture consists of multiple database instances working together as a single logical unit. This setup is designed for high availability, scalability, and load balancing. Clustered databases can be configured in various ways, including master-master or master-slave replication schemes.
- In a clustered environment, databases can handle more read and write operations concurrently by distributing the load across multiple nodes. Failover mechanisms are inherent, as other nodes in the cluster can take over if one node fails, ensuring high availability.
- The clustered architecture offers the best scalability and availability but is the most complex to set up and manage. It requires careful planning for load balancing, data consistency, and failover procedures.
Deployment Requirements:
Recently as of October 2023 a patch was implemented to add support for regions during backup creation which is fantastic: https://storyboard.openstack.org/#!/story/2010950. An issue though that came from that, and not in any part to the patch itself was that previously offered OpenStack Trove docker images from docker hub for backups, do not support this and error out during backup creation. I have had a brief chat with Gabriel from the thread above, and a huge thank you to him pointed this out. So this led me to deploying my own docker registry and creating my own images, not only for security purpose, speed, but also to be able to maintain cadence of image release – as well as some others Gabriel mentioned on the storyboard.
While the Trove project does include an Ansible playbook to create a Docker registry and upload images, I found that to be dated and I was able to, for example add some other newer versions for mysql and mariadb that weren’t part of the repo. You can clone that here: https://github.com/jjblack604/homelabbound/tree/main/docker_trove_datastores. (Note I have only ran docker image builds off of Trove master branch, it would likely work fine on stable branches as the scripts used to build docker images don’t really rely on anything from the branches themselves. Scripts are templated over by my role anyways. They are just improved versions of the original.) This role will create a docker registry for you with password auth, download the images, push them, create the backup images and push them to your registry. This docker registry host should be publicly available for your tenant datastores to pull the images from. I have mine deployed behind haproxy with SSL so keep that in mind as well if you are planning on running a registry of your own. Also do yourself a favor, and keep the registry close to your OpenStack environment, but it needs to be public, consider running it even within a VM in your cloud.
It is recommended to use a dedicated rabbit cluster for security purposes, though for my lab I will not be doing that.
If you wish to use backups or logs etc, you will need to have Swift deployed or Swift API integration via Ceph RGW. (Swift API really is a must here, even though it could be considered optional I suppose if you want to just see a Trove instance spin up).
Note that if you wish to set `nova_keypair` value under defaults, the keypair needs to be created under the trove service project user, not the admin project.
As I use OpenStack Ansible to deploy my environment these were the following variables I set:
openstack_user_config:

trove-infra_hosts:
  os1:
    ip: 172.29.228.211
  os2:
    ip: 172.29.228.212
  os3:
    ip: 172.29.228.213
user_variables:

trove_service_net_setup: true
trove_service_net_name: "dbaas-network"
trove_service_net_phys_net: "dbaas-mgmt"
trove_service_net_type: "flat"
trove_service_subnet_name: "dbaas-network-ipv4"
trove_service_net_subnet_cidr: "172.29.216.0/22"
trove_service_net_allocation_pool_start: "172.29.217.0"
trove_service_net_allocation_pool_end: "172.29.219.254"
trove_container_registry_password: "YOUR_DOCKER_REGISTRY_PASSWORD"

# SEE  vim trove/common/cfg.py for all config options
# Filed bug and fix for transport_urls being templated incorrectly: https://bugs.launchpad.net/openstack-ansible/+bug/2056663
trove_config_overrides:
  DEFAULT:
    docker_insecure_registries: docker.example.com
    trove_volume_support: False # Default
    volume_rootdisk_support: False # Default - for host os to use ephemeral storage
    volume_rootdisk_size: 10 # Default - for host os to use ephemeral storage
    volume_fstype: ext4 # By default is ext3 ick
    enable_volume_az: True #Ensure volume lives in same AZ
    swift_endpoint_type: public # no luck with internal
    transport_url: "{{ trove_oslomsg_rpc_transport }}://{% for host in trove_oslomsg_rpc_servers.split(',') %}{{ trove_oslomsg_rpc_userid }}:{{ trove_oslomsg_rpc_password }}@{{ host }}:{{ trove_oslomsg_rpc_port }}{% if not loop.last %},{% else %}/{{ _trove_oslomsg_rpc_vhost_conf }}{% if trove_oslomsg_rpc_use_ssl | bool %}?ssl=1&ssl_version={{ trove_oslomsg_rpc_ssl_version }}&ssl_ca_file={{ trove_oslomsg_rpc_ssl_ca_file }}{% else %}?ssl=0{% endif %}{% endif %}{% endfor %}"
  oslo_messaging_notifications:
    transport_url: "{{ trove_oslomsg_notify_transport }}://{% for host in trove_oslomsg_notify_servers.split(',') %}{{ trove_oslomsg_notify_userid }}:{{ trove_oslomsg_notify_password }}@{{ host }}:{{ trove_oslomsg_notify_port }}{% if not loop.last %},{% else %}/{{ _trove_oslomsg_notify_vhost_conf }}{% if trove_oslomsg_notify_use_ssl | bool %}?ssl=1&ssl_version={{ trove_oslomsg_notify_ssl_version }}&ssl_ca_file={{ trove_oslomsg_notify_ssl_ca_file }}{% else %}?ssl=0{% endif %}{% endif %}{% endfor %}"
  oslo_messaging_rabbit:
    ssl: True
    rpc_conn_pool_size: 30
    heartbeat_in_pthread: True
    rabbit_quorum_queue: "{{ trove_oslomsg_rabbit_quorum_queues }}"
    rabbit_quorum_delivery_limit: "{{ trove_oslomsg_rabbit_quorum_delivery_limit }}"
    rabbit_quorum_max_memory_bytes: "{{ trove_oslomsg_rabbit_quorum_max_memory_bytes }}"
  mysql:
    datastore_manager: mysql
  mariadb:
    datastore_manager: mariadb
  postgresql:
    datastore_manager: postgresql

trove_guestagent_config_overrides:
  DEFAULT:
    transport_url: "{{ trove_oslomsg_rpc_transport }}://{% for host in trove_oslomsg_rpc_servers.split(',') %}{{ trove_oslomsg_rpc_userid }}:{{ trove_oslomsg_rpc_password }}@{{ host }}:{{ trove_oslomsg_rpc_port }}{% if not loop.last %},{% else %}/{{ _trove_oslomsg_rpc_vhost_conf }}{% if trove_oslomsg_rpc_use_ssl | bool %}?ssl=1&ssl_version={{ trove_oslomsg_rpc_ssl_version }}&ssl_ca_file={{ trove_oslomsg_rpc_ssl_ca_file }}{% else %}?ssl=0{% endif %}{% endif %}{% endfor %}"
  oslo_messaging_notifications:
    transport_url: "{{ trove_oslomsg_notify_transport }}://{% for host in trove_oslomsg_notify_servers.split(',') %}{{ trove_oslomsg_notify_userid }}:{{ trove_oslomsg_notify_password }}@{{ host }}:{{ trove_oslomsg_notify_port }}{% if not loop.last %},{% else %}/{{ _trove_oslomsg_notify_vhost_conf }}{% if trove_oslomsg_notify_use_ssl | bool %}?ssl=1&ssl_version={{ trove_oslomsg_notify_ssl_version }}&ssl_ca_file={{ trove_oslomsg_notify_ssl_ca_file }}{% else %}?ssl=0{% endif %}{% endif %}{% endfor %}"
  oslo_messaging_rabbit:
    ssl: True
    rpc_conn_pool_size: 30
    heartbeat_in_pthread: True
    rabbit_quorum_queue: "{{ trove_oslomsg_rabbit_quorum_queues }}"
    rabbit_quorum_delivery_limit: "{{ trove_oslomsg_rabbit_quorum_delivery_limit }}"
    rabbit_quorum_max_memory_bytes: "{{ trove_oslomsg_rabbit_quorum_max_memory_bytes }}"
  guest_agent:
    container_registry: docker.example.com
    container_registry_username: admin
    container_registry_password: "{{ trove_container_registry_password }}"
  mysql:
    volume_support: True # Default is True and will provision to /dev/vdb via Ceph - Not to be confused with trove_volume_support - This is granular control
    datastore_manager: mysql
    docker_image: docker.example.com/trove-datastores/mysql
    backup_docker_image: docker.example.com/trove-datastores/db-backup-mysql
  mariadb:
    volume_support: True # Default is True and will provision to /dev/vdb via Ceph - Not to be confused with trove_volume_support - This is granular control
    datastore_manager: mariadb
    docker_image: docker.example.com/trove-datastores/mariadb
    backup_docker_image: docker.example.com/trove-datastores/db-backup-mariadb
  postgresql:
    volume_support: True # Default is True and will provision to /dev/vdb via Ceph - Not to be confused with trove_volume_support - This is granular control
    datastore_manager: postgresql
    docker_image: docker.example.com/trove-datastores/postgresql
    backup_docker_image: docker.example.com/trove-datastores/db-backup-postgresql
Once that is configured, in OpenStack Ansible, create lxc and then install os-trove.
Next and ideally from the OSA deployment host or utility container or wherever you prefer to interact with the OpenStack API from, clone the trove repo from https://github.com/openstack/trove. Folow the steps here https://docs.openstack.org/trove/latest/admin/building_guest_images.html to build a guest image and upload it for users to provision from.
Source your openrc file and:
Depending on your preference for qcow2 or raw you could potentially upload the created image with:
#QCOW2
openstack image create trove-guest-ubuntu-jammy --private --disk-format qcow2 --container-format bare --tag trove --tag mysql --tag mariadb --tag postgresql --tag mongodb --file ~/images/trove-guest-ubuntu-jammy.qcow2

#RAW
openstack image create trove-guest-ubuntu-jammy --private --disk-format raw --container-format bare --tag trove --tag mysql --tag mariadb --tag postgresql --tag mongodb --tag redis --file trove-master-guest-ubuntu-jammy.raw
If you are using my repo to create docker images/backup images and your own registry you can create some datastores and versions for example with
openstack datastore version create 8.0 mysql mysql "" --image-tags trove,mysql --active --default --version-number 8.0
openstack datastore version create 8.3 mysql mysql "" --image-tags trove,mysql --active --version-number 8.3
openstack datastore version create 10.4 mariadb mariadb "" --image-tags trove,mariadb --active --version-number 10.4
openstack datastore version create 10.6 mariadb mariadb "" --image-tags trove,mariadb --active --version-number 10.6
openstack datastore version create 11.3.2 mariadb mariadb "" --image-tags trove,mariadb --active --version-number 11.3.2 # jammy build
openstack datastore version create 12 postgresql postgresql "" --image-tags trove,postgresql --active --version-number 12
The navigate to the Trove LXC, source the Trove venv source /openstack/venvs/trove-28.0.1/bin/activate. You will then need to clone the trove repo again, for our purposes clone it into /root/ you will also need to copy over an openrc file temporarily. (Note the general steps are available in the Trove building guest images – these are updated for use with OSA).
Once cloned, for each of the respective datastores we have created, let’s create the validation rules:
trove-manage db_load_datastore_config_parameters mysql 8.0 /root/trove/trove/templates/mysql/validation-rules.json
trove-manage db_load_datastore_config_parameters mysql 8.3 /root/trove/trove/templates/mysql/validation-rules.json
trove-manage db_load_datastore_config_parameters mariadb 10.4 /root/trove/trove/templates/mariadb/validation-rules.json
trove-manage db_load_datastore_config_parameters mariadb 10.6 /root/trove/trove/templates/mariadb/validation-rules.json
trove-manage db_load_datastore_config_parameters mariadb 11.3.2 /root/trove/trove/templates/mariadb/validation-rules.json
trove-manage db_load_datastore_config_parameters postgresql 12 /root/trove/trove/templates/postgresql/validation-rules.json
Let’s verify that we can see our datastores:
root@openstack-deploy:/opt/openstack-ansible/playbooks# openstack datastore list
+--------------------------------------+------------+
| ID                                   | Name       |
+--------------------------------------+------------+
| 1edc1bb6-245e-4598-9780-a3dbbc740806 | mariadb    |
| 4649e4c0-12ca-41d4-8626-fcaccbdf8d8d | postgresql |
| bf7e4fdd-ee2a-41f5-895a-66a1cb3382dd | mysql      |
+--------------------------------------+------------+
root@openstack-deploy:/opt/openstack-ansible/playbooks# openstack datastore version list 1edc1bb6-245e-4598-9780-a3dbbc740806
+--------------------------------------+--------+---------+
| ID | Name | Version |
+--------------------------------------+--------+---------+
| e07bec72-24e4-4756-ba79-1dba7d0366d4 | 10.4 | 10.4 |
| 03268031-a1cb-4daf-a1a6-3a00bf4c58e8 | 10.6 | 10.6 |
| 0e8bdbee-071e-4a24-9450-3c341dafc916 | 11.3.2 | 11.3.2 |
+--------------------------------------+--------+---------+
root@openstack-deploy:/opt/openstack-ansible/playbooks# openstack datastore version list 4649e4c0-12ca-41d4-8626-fcaccbdf8d8d
+--------------------------------------+------+---------+
| ID | Name | Version |
+--------------------------------------+------+---------+
| 7af3c4bb-2835-4fc2-a7f7-3c8e2d6c999e | 12 | 12 |
+--------------------------------------+------+---------+
root@openstack-deploy:/opt/openstack-ansible/playbooks# openstack datastore version list bf7e4fdd-ee2a-41f5-895a-66a1cb3382dd
+--------------------------------------+------+---------+
| ID | Name | Version |
+--------------------------------------+------+---------+
| f6dbc9cb-1739-43ca-91cc-7e404950bb8e | 8.0 | 8.0 |
| fbb4f912-f7b8-4199-9c91-abdd56b5eae8 | 8.3 | 8.3 |
+--------------------------------------+------+---------+
Deploying a Trove Instance:
Prior to beginning, you will need to configure a private network, with a Router attached to a public provider network in OpenStack. Trove instances do not use internal connectivity to pull docker images or perform backups.
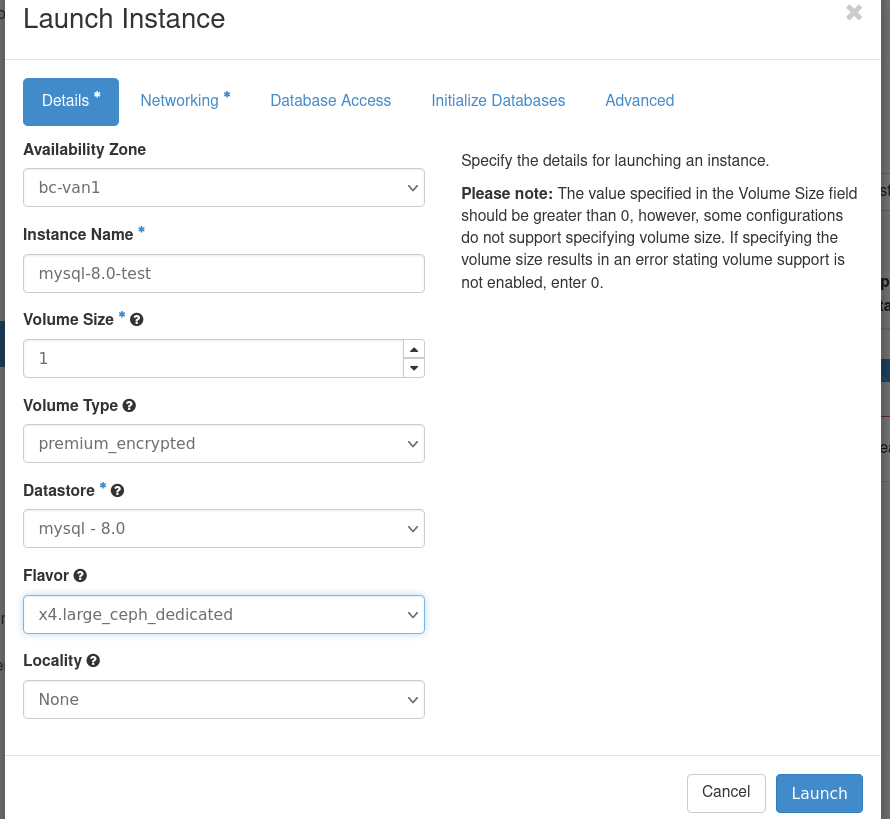
Create Instance Mysql8.0:
Select various Details:
Select the network to attach to:

Create databases and admin user:

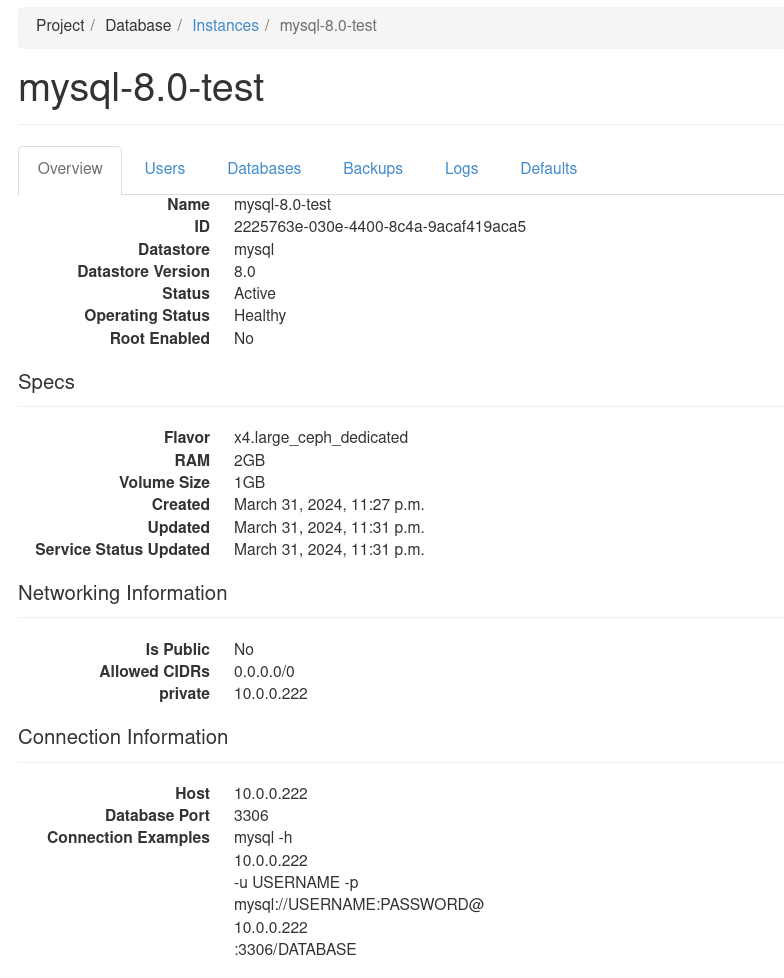
Check instance is provisioned:
Check provisioned instance details:
Check users:
Check databases:
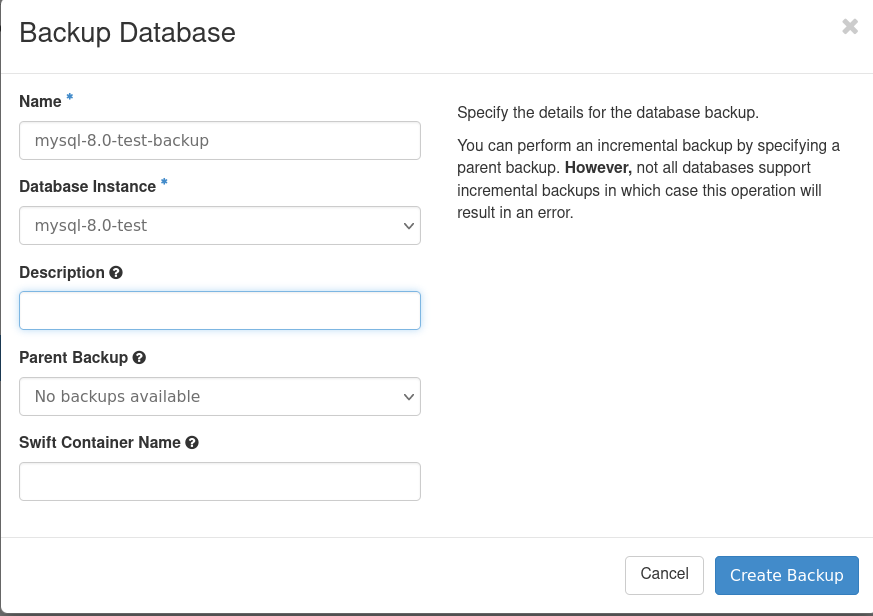
Test Backup Creation:
By default items will end up in database_backups container if not specified.
Verify backup has created:
It can also be viewed from the Swift Dashboard (or CLI of course) and downloaded.
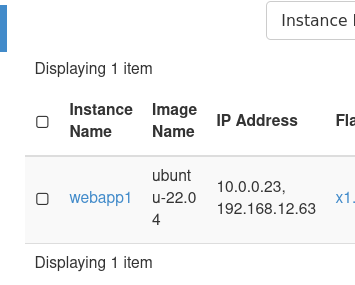
Create a Nova instance called webapp1:
This instance will interact with our database (for my lab 192.168.12.x/24 is the ‘public’ network where I assigned a FIP).
Check connectivity from webapp host:
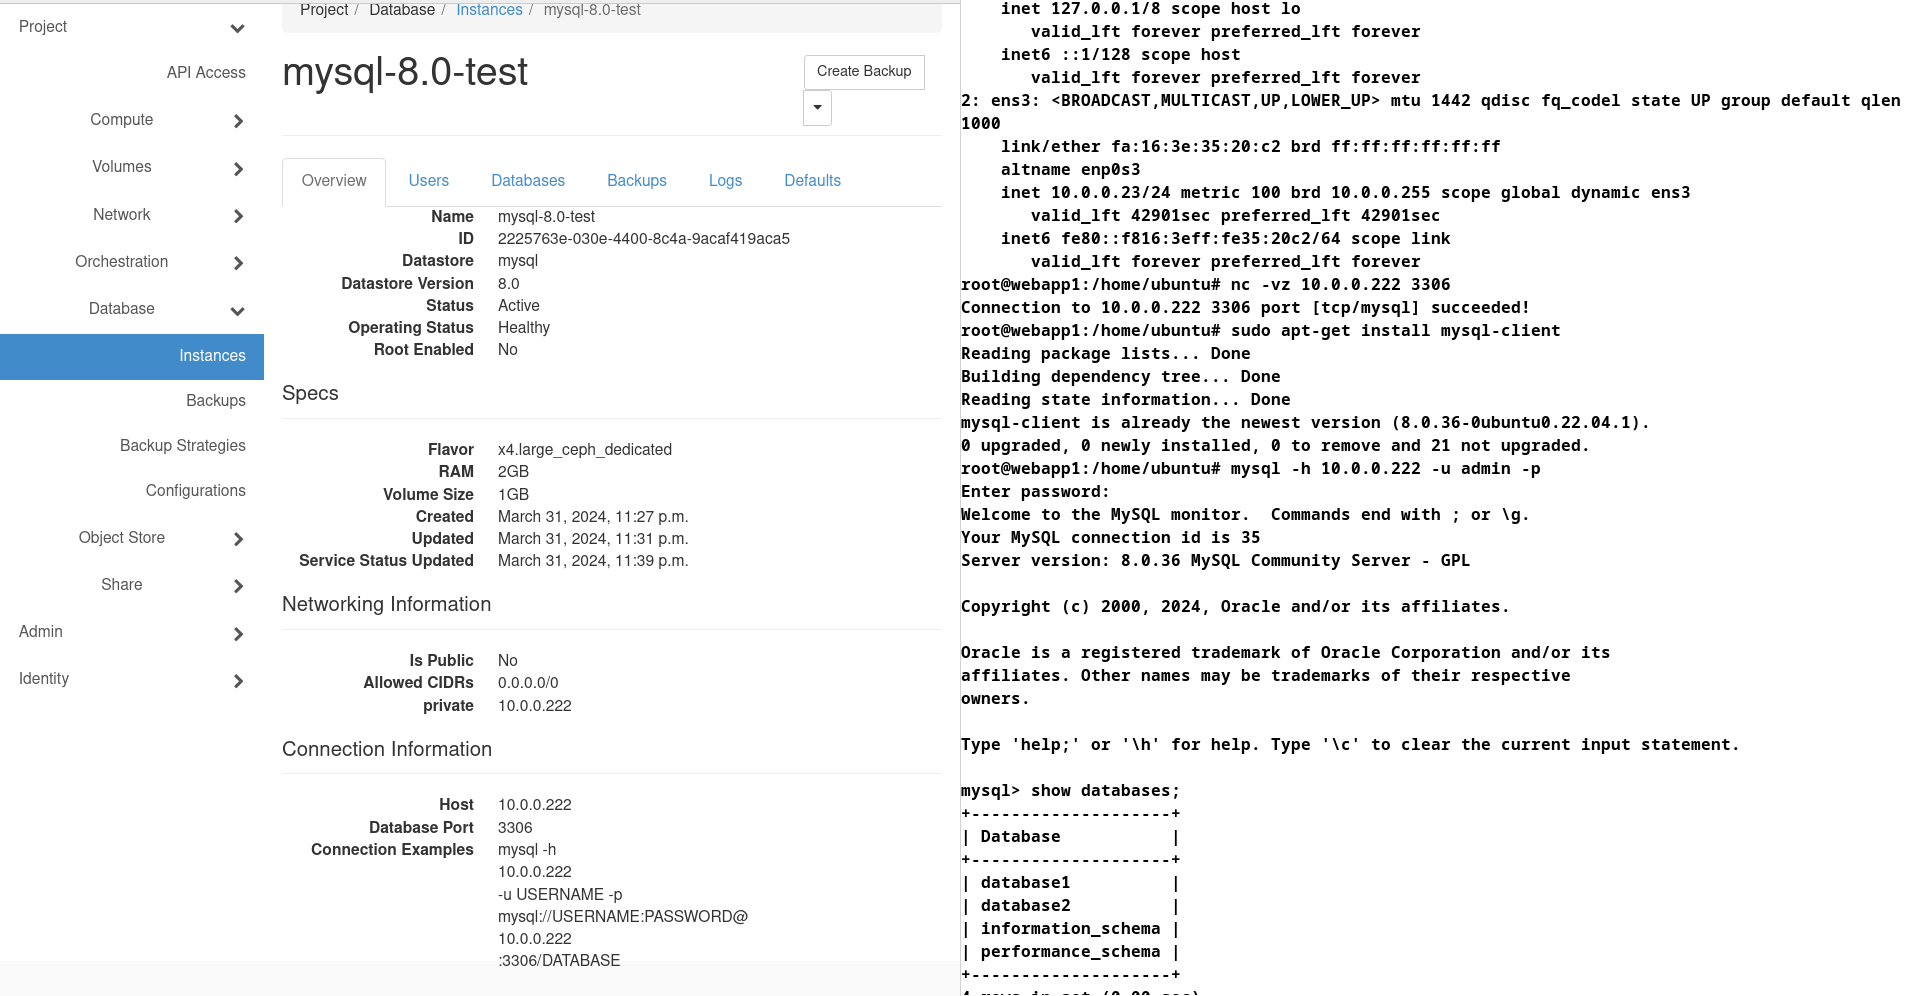
We can see my webapp host as an IP of 10.0.0.23 and my mysql-8.0-test database instance has an ip of 10.0.0.222 and that I can connect to it via port 3306 with netcat. I had already installed the mysql-client, and proceeded to login. We can see the databases I had created are present.
Add a new database and grant permissions:
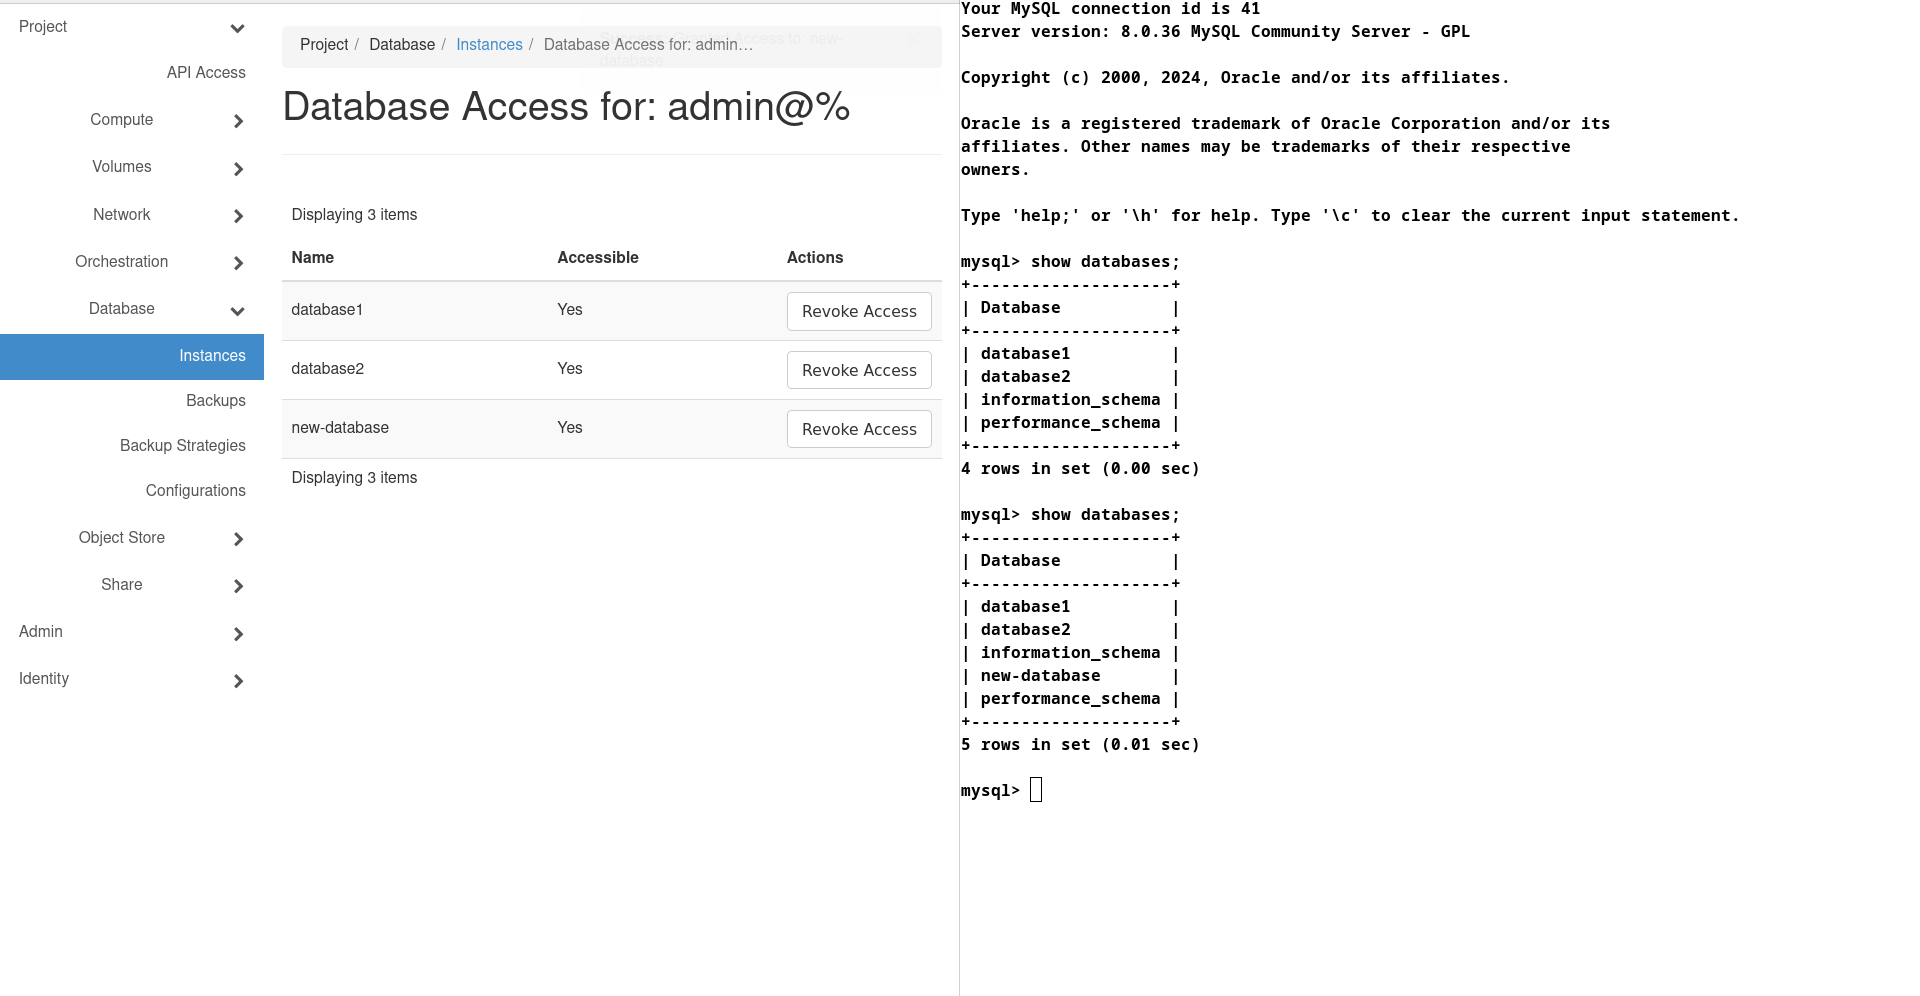
Created a new database through Horizon called ‘new-database’ and we can see the before and after access was granted on the right.
Adding a Replica:
We will do this from the CLI, the Horizon interface I’ve found to be quite limiting compared to the CLI in my experience. We will add the replica in a different availability zone.
root@openstack-deploy:/home/jblack# openstack database instance list
+--------------------------------------+----------------+-----------+-------------------+--------+------------------+--------+---------------------------------------------------------------------------------------------------+--------------------------------------+------+------+
| ID | Name | Datastore | Datastore Version | Status | Operating Status | Public | Addresses | Flavor ID | Size | Role |
+--------------------------------------+----------------+-----------+-------------------+--------+------------------+--------+---------------------------------------------------------------------------------------------------+--------------------------------------+------+------+
| 2225763e-030e-4400-8c4a-9acaf419aca5 | mysql-8.0-test | mysql | 8.0 | ACTIVE | HEALTHY | False | [{'address': '10.0.0.222', 'type': 'private', 'network': 'af692024-b215-4d5b-bbf1-9e2711198734'}] | e4aabb40-fa02-43af-b5ff-3f2c00f2eca8 | 1 | |
+--------------------------------------+----------------+-----------+-------------------+--------+------------------+--------+---------------------------------------------------------------------------------------------------+-------------
root@openstack-deploy:/home/jblack# openstack database instance create test-replica --nic net-id=af692024-b215-4d5b-bbf1-9e2711198734 --replica-of 2225763e-030e-4400-8c4a-9acaf419aca5 --availability-zone bc-van2
+--------------------------+--------------------------------------+
| Field | Value |
+--------------------------+--------------------------------------+
| allowed_cidrs | [] |
| created | 2024-04-01T07:18:24 |
| datastore | mysql |
| datastore_version | 8.0 |
| datastore_version_number | 8.0 |
| encrypted_rpc_messaging | True |
| flavor | e4aabb40-fa02-43af-b5ff-3f2c00f2eca8 |
| id | df9f6b59-4109-432c-a73c-0a82c05ca563 |
| name | test-replica |
| operating_status | |
| public | False |
| region | canada-west |
| replica_of | 2225763e-030e-4400-8c4a-9acaf419aca5 |
| server_id | None |
| service_status_updated | 2024-04-01T07:18:24 |
| status | BUILD |
| tenant_id | 2a5d1b9eed464656860b6d4ab53e02a9 |
| updated | 2024-04-01T07:18:24 |
| volume | 1 |
| volume_id | None |
+--------------------------+--------------------------------------+
Verify replica is active:
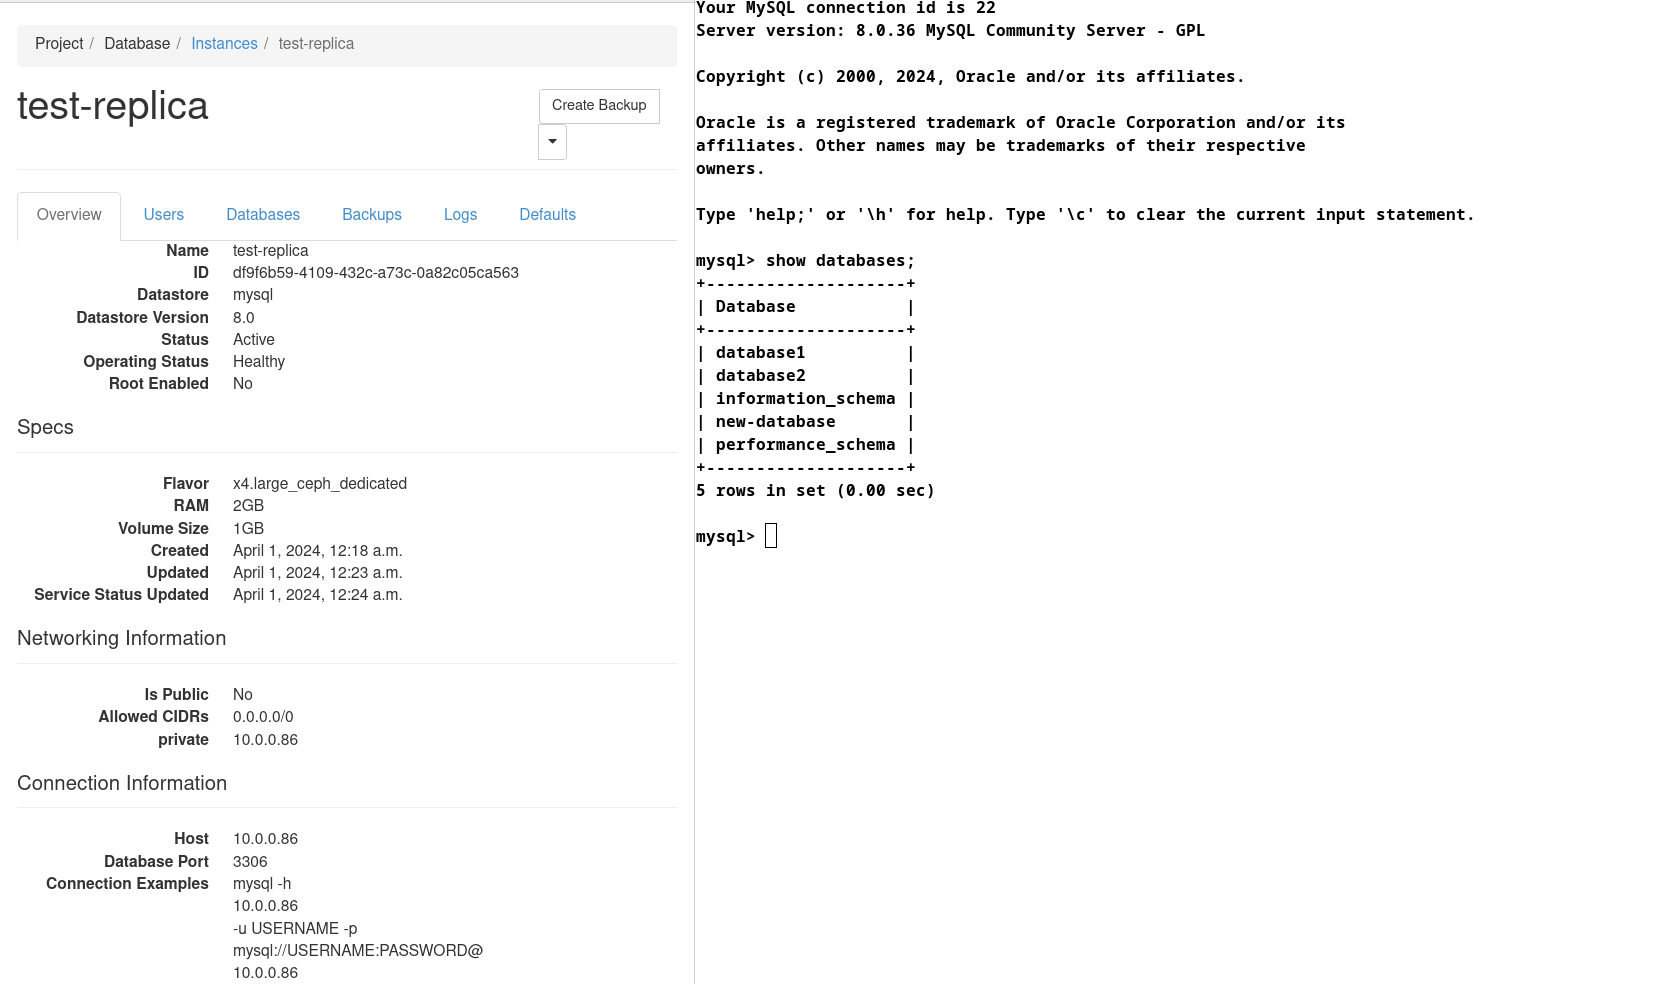
Verify connectivity to new replica:
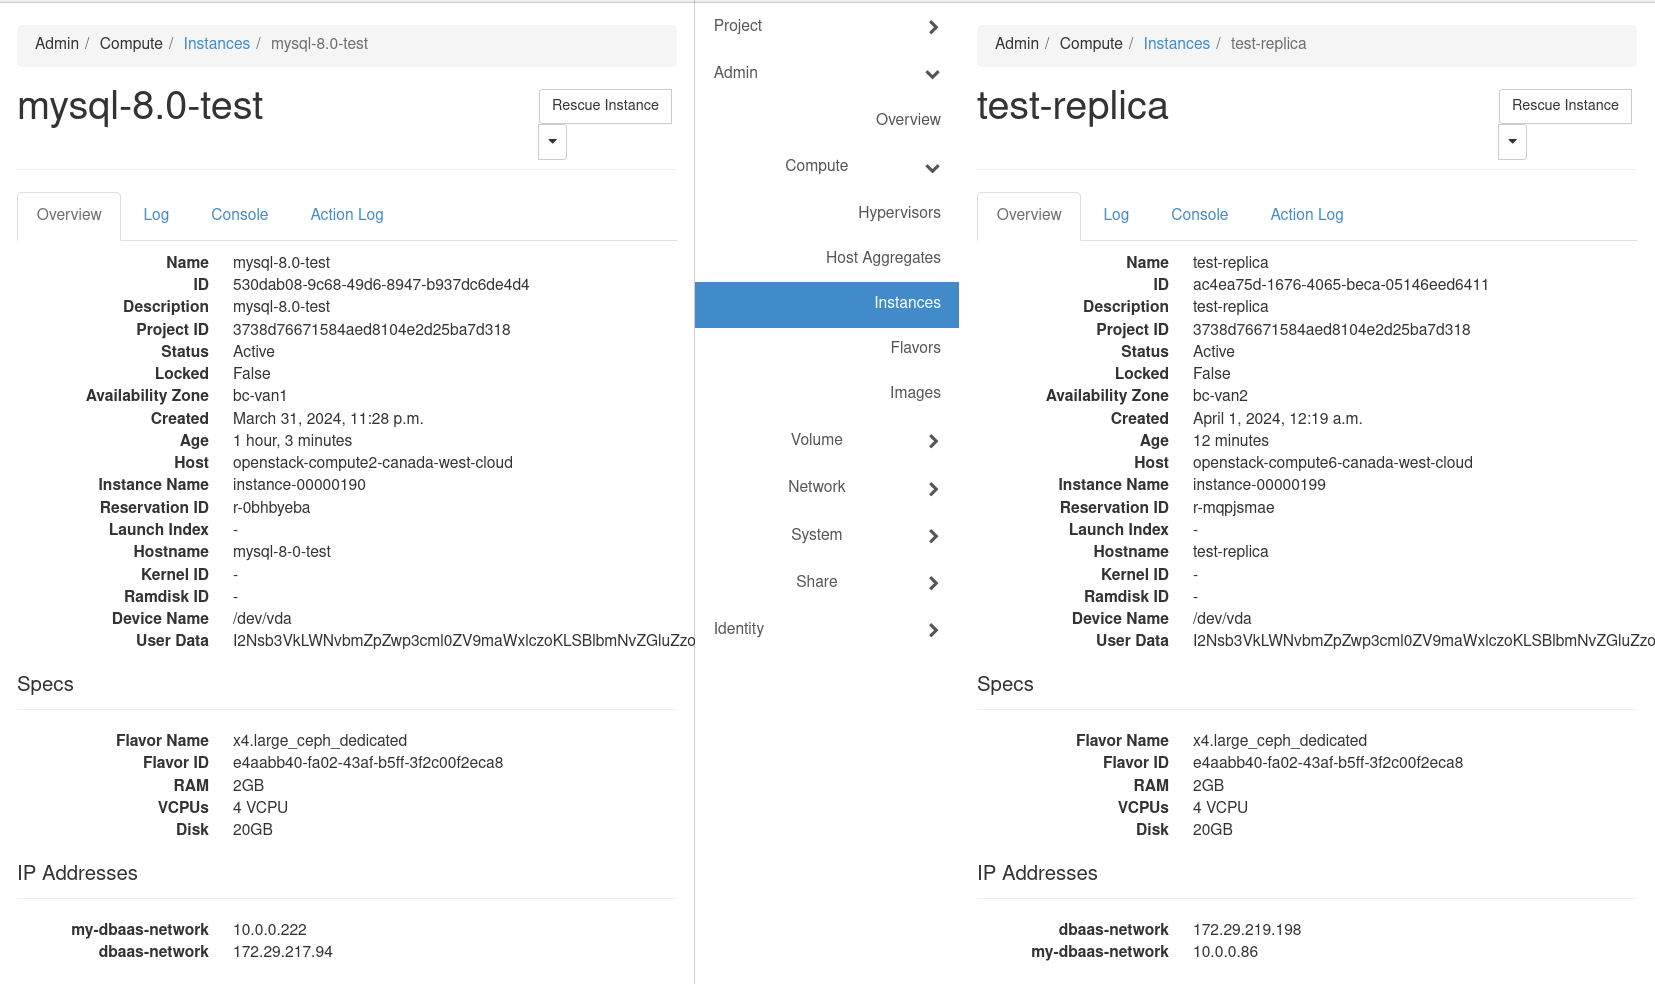
Verify primary and replica are in different Availability Zones:
Misc Notes:
As someone who has no issues deploying multiple instances through automation and setting up a single or clustered database, I personally am not overly enticed to use Trove – especially from the engineering perspective overhead that comes with it. Additionally to this, Trove looks to creates quite a bit of administrative and management overhead not only through the need to update the environment, but to manage docker images that end users can deploy databases with through their lifecycle and facilitate those upgrades. Users will also not have CLI access to the instance and shouldn’t, the Trove Guest instance image should not be shared out for regular instance creation as well if any proprietary configurations have been added to the image, so caution should be warranted to make sure this does not happen accidentally.
Further, I did find it inconvenient having to look at logs through a GUI or export them through the Trove Client CLI to Swift or other option. Direct CLI access to me is far more convenient for countless reasons. There is also of course the well known and circulated security risks re: rabbitmq and why it is important to have a dedicated rabbitmq cluster for Trove, though a patch was added several releases ago to aid in addressing this by allowing for RPC messages to be encrypted between control plane and guest instances. Trove also looks to not ‘require’ Swift, but there will be no logging, replicas or backups without it. (Whether that is Swift directly or Ceph RGW w/ Swift API Enabled and integrated with OpenStack Swift endpoints that’s up to you).
Many Clouds offer either local disk storage as a backend, Ceph, both or other combination. With adequate automated backups in place, and given that instances can be replicated I am leaning to having databases OS and Database Disks deployed to local storage. This to me also limits failure domain, Ceph is a single point of failure and even though yes it can be mirrored, that may be a greater overhead than a handful of database instances lost on a compute node, when backups could be available in the same region. This is of course theoretical as I have not tested it myself and that is a work in progress and am currently using local storage for the OS but Ceph backed volumes for the database disk. (Note a variety of scenarios and architecture discussion points are in the works for Part 2).
Final Thoughts:
The lack of direct access to the CLI makes Trove a bit unappealing – for me. It is layer of overhead that a database administrator may find inconvenient in some use cases, especially when it comes to checking in on system resources, security implementations, operating system updates etc. The additional reliance on Swift for Log Dumps and Backups is just another layer in the middle for unnecessary complexity.
So, is there a place for Trove? Absolutely. Not all end users have the technical skill set or more importantly the time to manage and deploy the underlying infrastructure, physical or virtual to support a database let alone a replicated or clustered one (not that trove supports clusters at the moment). Maybe too, people just don’t want to deal with the management overhead, hence, why some Clouds may offer it as a service. If you are planning on implementing Trove, it is likely going to sway the balance of your engineers time somewhat disproportionately compared to other modules but could be a very worthwhile addition especially if there is a good target audience.
Most importantly I do feel the need to be cautious with this project and question its longevity. I do think some other form of automation may be just as effective as Trove – but that is a whole different can of worms.
With all that said, please keep in mind, this isn’t an overly in-depth article and really in some aspects could be considered an opinion piece. Additionally to mention, there are tons of command line options and other features that have not been covered, which I hope to address in future work.
Future Work:
There are several topics I wish to investigate further and will likely make a part 2 post at some point.
These topics would include:
- Dedicated Flavors for Trove
- Security Considerations
- Configuration Groups
- Automated Backups
- Replicas in Detail
- Loadbalancing
- Clustering (if and where possible)
- Additional Datastores
- Local vs Ceph Backed Storage
- Cost effectiveness
- Risk
- Performance
- Availability Zones in Depth
- Best Practices
- Upgrading Trove
- And so on..
Trove resources:
https://docs.openstack.org/trove/latest/
https://docs.openstack.org/trove/latest/admin/run_trove_in_production.html
https://docs.openstack.org/trove/latest/admin/building_guest_images.html
https://docs.openstack.org/trove/latest/admin/troubleshooting.html
https://docs.openstack.org/openstack-ansible-os_trove/latest/configure-trove.html
https://wiki.openstack.org/wiki/TroveVision
Excerpt from above link regarding provisioning:
- If availability zones are available trove automatically schedules each node of a cluster in different AZs (I have not verified this*)
- If attached storage is not available trove uses local storage for storing datastore data.
https://docs.openstack.org/trove/latest/cli/trove-manage.html
Notes: I use OpenStack Ansible to deploy and manage my environment. As of Mar 9/24 the new RabbitMQ Quorum Based Queues have a code mistype that is not mapping vhosts correctly for the guest agent template and instead pushing the list to file. Bug filed: https://bugs.launchpad.net/openstack-ansible/+bug/2056663.
Troubleshooting:
If using a multisite replicated Ceph cluster as a backend for the Swift API, ensure the endpoint only using RGW backends from the primary availability zone in Ceph. The replication delay will cause Trove backups to fail if the container has not yet populated, same for the backup itself. This caused me a world of grief because by the time I went to check if the container name or backups were there – by the time I got there, they were, but not fast enough for Trove :).
Docker Manifest errors, images potentially need to be rebuilt. Ensure you trial all your images before releasing to end users.

